India Technology Blogs Network |
| Back To The Future [iface thoughts] Posted: 07 May 2008 08:20 AM CDT
Now, I believe that static sites do have their place even in this age. However, it is wrong to choose this solution because you want to avoid the other ones. Just like everything else in life, even this solution has its cons, which get ignored now and highlighted when they become the Achilles’ heel. And then even this will get avoided. And its a tragedy that this happens a lot in the industry too!      |
| NirCmd - Free command line tool for Windows XP and Vista [Online Tech Tips] Posted: 07 May 2008 06:24 AM CDT Are you scared of using the Windows command prompt to accomplish tasks? If so, you’re definitely missing out on some cool stuff you can do on your computer. However, it’s understandable as the syntax can be quite technical and you really don’t want to mess something up if you don’t know what you’re doing. Luckily, there is a free utility called NirCmd that you can use that extends the functionality of the command prompt and makes it a little bit easier to use DOS commands without having to know DOS. NirCmd is a small command-line utility that allows you to do some useful tasks without displaying any command prompt user interface. You can use it to do all kinds of useful stuff for you such as writing and deleting values registry keys, writing values into INI file, dialing your Internet account or connecting to a VPN network, restarting windows or shutting down the computer, creating a shortcut to a file, chaning the created/modified date of a file, changing your display settings, turning off your monitor, opening the door of your CD-ROM drive, and lots more! The best thing about this program is that you can create a scheduled task to simple run any command you want at a set interval. So you can create a scheduled task to turn off your monitor or turn off your computer every day at midnight or to mute the volume on your computer every morning. Download the zip file (scroll all the way down) and un-zip the folder somewhere on your computer, preferably in My Documents or some location where it will stay permanently. Now double-click on the NirCmd.exe file and you’ll get a popup that has a button called “Copy to Windows Directory“. Now you could simply run any of the commands by going to the Windows command prompt and typing something in. For example, go to Start, then Run and then type in CMD. Now type in any command that was listed in the command list. This is great, but you still have to use the Windows command prompt. Another nifty way to use Nircmd is to create a scheduled task, like I mentioned before. So first, go to Start, then Control Panel and then Scheduled Tasks. Then go to File, New and choose Scheduled Task. Or double-click Add Scheduled Task. Click Next to start up the wizard. Now you’ll have to choose the program you want to run. Click Browse and then go to the directory where NirCmd was unzipped and choose nircmd.exe (not nircmdc.exe). You’ll automatically be brought to the next screen where you have to give your task a name. So if I want this to turn off my computer, I would name it something like “Turn Off Computer” and then choose whether you want it to be Daily, Weekly, Monthly, etc. In the next screen, you can select the time and the date to start running the command. Click Next and type in the administrator user name and password for your computer. Make sure the account is an administrator. Finally, review your settings and check the “Open advanced properties for this task when I click Finish” box. Then click Finish. Now in the properties, you will see the tab Task and a box called Run at the top tha is pointing to the NirCmd.exe file. Now to run any specific task, just add the parameters after the last quotation mark. So if you wanted to open the CD ROM drive, just add a space and then “cdrom open e:” after the quotes. That’s it! Now that command will run according to the schedule you created. You can change that last part to any of the other commands that were specified in the command list. For example, mutesysvolume 1 - will mute the system volume monitor off - will turn off the monitor exitwin poweroff - turn off your computer Just add any of these to the Run box like shown above. If you want to have multiple commands run at different times, just create more scheduled tasks in the same way! Great way to automate tasks on your computer easily! Enjoy! Technorati Tags: nircmd, command line tool, command line tools, windows command line tools, xp command line tools, free command line tools, windows command line toolvista command line tools
Related postsCopyright © 2007 Online Tech Tips. Aseem Kishore (digitalfingerprint: a59a56dce36427d83e23b501579944fcakmk1980 (66.150.96.109) ) NirCmd - Free command line tool for Windows XP and Vista       |
| Link to specific slides in other PowerPoint presentations [Online Tech Tips] Posted: 07 May 2008 06:01 AM CDT Have you ever wanted to link your power point presentation to another one? What if you could link it to a specific slide in the other presentation? What if you could link it to a Word or Excel document as well (and specify exactly which part of the document you want to open)? Well, it can be done – and I'm here to tell you how. To start with, you will need to have your power point presentation as well as the other file that you want to link to. In this example, we will be linking two power point presentations together and jumping immediately to Slide 2 on the second presentation. Step 1: Find or create the object that you want for your link. This could be a pictures, clip art, or word group. Select that object and click on the Hyperlink button under the Insert toolbar. (Note: These directions are being given for Power Point 2007 version, but can be easily adapted for any previous version). Step 2: Now the hyperlink dialog box has opened, browse for and find your file that you want to link to. Click once to highlight the file, but do not close the dialog box yet – there is one more step to do. Note: If you finish at this step, you will simply link to the entire presentation or document, instead of to a specific location within that document. Step 3: Click on the Bookmarks button located on the right hand side of the dialog box. This button will open another window where you can select the location you wish to jump to in the linked document. If you are linking to a power point document, it will display all of the different slides. If you are linking to a Word or Excel document, it will display previously saved bookmarked locations and named cell ranges. Choose the location you want and select it. Step 4: Click on the appropriate buttons to close and save the changes you just made. Step 5: Test the link to make sure it is working how you wanted it to. Note: Hyperlinks in power point only work when you are in slide show mode. This feature can be very useful if you want to use a portion of a different presentation in your own, but don't want to make your presentation huge in the process. It is also useful if you want to tailor your presentation to different audiences. For some audiences, you can go through your presentation without clicking on the hyperlink, but others might need more details, so then you click on the hyperlink and show them the additional information. This is a guest post by Karen Worthy, a tech enthusiast. Technorati Tags: hyperlink, MS PowerPoint, power point, Microsoft, Excel, Word, MS Excel, MS Word, insert link, link to specific slides
Related postsCopyright © 2007 Online Tech Tips. Aseem Kishore (digitalfingerprint: a59a56dce36427d83e23b501579944fcakmk1980 (66.150.96.109) ) Link to specific slides in other PowerPoint presentations       |
| Windows XP SP3 Available through Windows Update [-| Life Rocks! 2.0 |-] Posted: 07 May 2008 12:42 AM CDT Earlier Microsoft had delayed the release of Windows XP SP3 through Windows Update due to some technical issue. Microsoft has announced that Window XP SP3 in now available through Windows Update. To install SP3 go to Windows Update and perform an express or custom install, make sure you see the service pack selected, and proceed with the install. Windows XP SP3 will not significantly change the Windows XP experience as most of the changes are under the hood. SP3 will be available through Automatic Updates in a few months time. Download Windows XP Service Pack 3 (SP3)      |
| Posted: 06 May 2008 09:13 PM CDT This is a great advancement on the Google custom search product. Now, Google allows you to customize your custom search by - - Letting you chose the sites from the which the results are to be displayed. - Letting you specify keywords so that the searches are related to those keywords I think this is an excellent way to refine and show more accurate results on the custom search. How much of this improvement converts to clicks is to be proven though. More information here and here. Copyright © 2008 DailySEOblog.com. This Feed is for personal non-commercial use only. If you are not reading this material in your news aggregator, the site you are looking at is guilty of copyright infringement. Please contact legal@www.dailyseoblog.com so we can take legal action immediately. Plugin by Taragana Do you want to place your link here for just $ 10 ? Contact me now. Ask your doubts on SEO at the discussion forums and get them answered by experts. FREE of course! Google customized search is now more customized Random Posts   |
| Posted: 06 May 2008 09:03 PM CDT Another innovation from Google is here to help you deal with your regional language, Hindi, Malayalam, Tamil etc on the iternet. Copyright © 2008 DailySEOblog.com. This Feed is for personal non-commercial use only. If you are not reading this material in your news aggregator, the site you are looking at is guilty of copyright infringement. Please contact legal@www.dailyseoblog.com so we can take legal action immediately. Plugin by Taragana Do you want to place your link here for just $ 10 ? Contact me now. Ask your doubts on SEO at the discussion forums and get them answered by experts. FREE of course! Now type in English and translate to Hindi Random Posts   |
| How to Convert Rows to Columns or Columns to Rows in Excel While using Formulas? [Lyte Byte] Posted: 06 May 2008 06:56 PM CDT Here is another small tip for Microsoft Excel. Many at times, the data is presented in different format in different Excel sheets and while moving the data from one sheet to another imposes copying the date from a row to a column or from a column to a row. It's easier to just convert using the Transpose function but it may be little tricky while using functions and formulas. So how to copy the data from a row to a column or vice versa?
First let's consider that we want to copy data from a row to a column. First copy the row and go to the sheet where you want to paste. In the column where you want to insert, right click at the column or cell and Click Paste Special. Check the box which says 'Transpose' and click Ok. This method is same in Office 2007 and earlier versions. The same thing applies which converting from a column to row. Also, this method not only applies to converting the whole rows to columns but also any group of vertical cells to horizontal cells or vice versa. Converting rows to columns and columns to rows while using formulas: If you are using formulas in your sheet, then you may have two cases. In Case 1, you are copying the referenced rows or columns along with the rows or columns from where it is being referred. In this case, you need not worry about copying or converting as the reference in the formulas are automatically adjusted in the new sheet. In Case 2, you are not copying the referenced rows or columns along with the rows or columns from where it is being referred. In both absolute and relative reference, the values it is being referred will not be referred correctly. So to correct this, in case 2, again you have two options.
Option A: You can use referencing style like "=Sheet1!$B$1" or if you are calling from another Excel Book, then "=[Book1.xls]Sheet1!$B$1". But in this case one must be careful not to change the location of the files and it will affect the referencing values. Option B: You can just copy and past only the values while you convert from rows to columns or columns to rows. To do this, while you are in Paste Special, check both Transpose and Values (under Paste). Copyright © 2008 This feed is for personal, non-commercial use only. The use of this feed on other websites breaches copyright. If this content is not in your news reader, it makes the page you are viewing an infringement of the copyright. (Digital Fingerprint: qfjk452hj34hjfjh12h4f1hj3dld45jd312j4112341d4hjdh) ---
    |
| Ego Surf Yourself with Addictomatic [Techie Buzz] Posted: 06 May 2008 03:55 PM CDT How many time have you Googled your name to see if your name shows up in the results? If your answer is atleast once then Additomatic would add to your excitement of ego surfing. Addictomatic searches multiple sites to fetch results for the name you type in. Some of those include Google, Yahoo, Twitter, Technorati, Digg, Bloglines, etc. Below is a list of complete source from which Addictomatic fetches its results.
I had earlier also talked about EgoSurf another website to search the Ego ranking of your blog. EgoSurf is a Web 2.0 based site that helps you find your blogs ranking in most of the popular search engines like Google, Yahoo, MSN and also Del.icio.us and Technorati. So with all these options available what are you waiting for, go and get your dose of Ego for today. Via: [Digital Inspiration] © Keith Dsouza for Techie Buzz, 2008. | Permalink | No comment | Add to ---       |
| 5 Free Tools to upload content to your web site [Techie Buzz] Posted: 06 May 2008 02:00 PM CDT If you have a blog or a web site you will be regularly updating it with content such as images, files, videos etc. There are various ways in which you can update your web site. Here are 5 utilities which make uploading content easy for you and best of all these utilities are free. The utilities are of two different types one which supports the regular File Transfer Protocol (FTP) and another which supports Secure Copy (SCP) which is more secure than transferring files using FTP. The list also includes two command line tools. FileZilla FileZilla is one of the most popular FTP clients around and I started using it around 5 years ago. FileZilla works on Windows NT4, 2000 and XP. It is a light weight client and can be used to manage all of your web sites from one client. You can easily set up a new web site with FileZilla. To add a new web site go to the File -> Site Manager option In that add your site hostname and any special port if required. Choose the server type, by default it should be FTP. In the logon type if the server allows Anonymous access then do not change logon type or else choose the other options available. I choose normal where I enter and store the username and password. You also have an option to specify a default directory where FileZilla local file browser should point to when connecting to a web site. To do this go to advanced options and key in the path to your directory in default local directory box, you can also specify the default directory remote directory that should be opened up when a connection is made to a site. That’s it you are all set now you can simply drag and drop your files to your FTP directory directly from your computer. It also supports several features such as ability to resume uploads/downloads, firewall support, drag and drop support etc FireFTP For those who just do not want to move away from Firefox there is a nifty tool that will allow you upload files from within the browser itself. FireFTP is a free, secure, cross platform FTP client that works with Firefox. The reason this is a beauty of a tool is that it brings a entire different application right within the browser. Highly recommended if you are a Firefox user. The UI for the FireFTP looks similar to a two panel windows explorer and you can easily drag and drop files between the windows. Adding a site is easy too. To add a site just click on manage account and select new, a new window will pop up where you have to enter the FTP details You can set up local and remote directories in the connection tab. The keep directories in sync while navigating option will automatically choose the local or remote directory to match the one that is selected by you. Once you have setup the web site information you can start using the FireFTP client to transfer the files to your web site. Download FireFTP Firefox Addon SmartFTP SmartFTP is another one of the free options which allow you to upload and download the files to and from your local PC and web site. With SmartFTP you can schedule your uploads and downloads, cache remote directories on your local PC, use a command line FTP tool, remotely edit your files without having to download them etc. It also provides you with file and folder synchronization and supports International Domain Names which contain foreign characters in their domains. You can also use the backup tools to backup your important web site files. WinSCP WinSCP is a windows client that allows you to transfer files securely between two computers. The WinSCP client supports SFTP and SCP protocols over SSH-1 and SSH-2 and can also be used as a plain FTP client. It sports two different transfer interface. It has a Windows Explorer based navigation and also a Norton Commander based navigation. You can also use it as a standalone client for portable devices. The application also has a inbuilt editor for files which can be invoked by pressing the F4 button, this is pretty decent feature as it allows me to quickly update files without having to download them to my local PC. In addition WinSCP also provides synchronization features between the local and remote files. PSCP Coming back to the plain old CLI (command line interface), PSCP is a real live saver while uploading files to Linux based servers. PSCP does not require you to install any software, you just need to store the executable in a folder on your local machine and use it via Command prompt. Download a copy of PSCP and place it on any drive of your windows machine, assuming you copied the file to C:\pscp.exe.
That’s it using the simple command you can directly upload the file using a command prompt, easy isn’t it. What is your favorite software to upload files to your web site. Are there any more better software’s that can be used to do this? Do let me know through your valuable comments. I would definitely like to try something better. © Keith Dsouza for Techie Buzz, 2008. | Permalink | 12 comments | Add to ---
      |
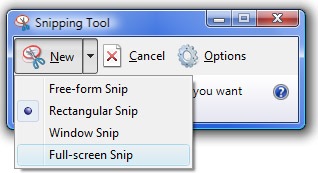
| How to take Screenshot with Vista Standard Snipping Tool [-| Life Rocks! 2.0 |-] Posted: 06 May 2008 01:52 PM CDT Whenever you compose posts for your blogs, you will need pictures to illustrate it and the most common method of taking screenshot is the ALT + Print screen command. There are many freewares to do the job. Vista has an in-build snipping tool to take screen shots. This feature in Vista might be turned off in some PC and Laptops, but you can activate it to take screen shots. This program belongs to the tablet PC functions of Vista. You will need Administrator rights to enable this feature. Open Control Panel and select ‘Programs’ and ‘Program and Features’. Click on ‘Turn Windows functions on or off’ and you can see various setting which can be turned on or off. Now select the check box beside Tablet PC optional Components. To Open this tool, click start menu and type snipping and press enter. When this is opened for first time, it will ask you whether it should add the tool in the quick start. This tool has pretty good options as well, it offers free form, rectangular, Windows and full screen snip. There is also provision to select the background color. Once you snip the screenshot you can save it in graphic formats like JPEG. This utility is available only in Vista Home Premium and Ultimate versions.      |


 del.icio.us
 digg
digg Technorati
 BlogPulse
 Google


| You are subscribed to email updates from India Technology Bloggers To stop receiving these emails, you may unsubscribe now. | Email Delivery powered by FeedBurner |
Inbox too full?  Subscribe to the feed version of India Technology Bloggers in a feed reader. Subscribe to the feed version of India Technology Bloggers in a feed reader. | |
| If you prefer to unsubscribe via postal mail, write to: India Technology Bloggers, c/o FeedBurner, 20 W Kinzie, 9th Floor, Chicago IL USA 60610 | |
No comments:
Post a Comment